


See how I built a giant RC gyrocopter that uses the autogyro-effect to fly, with unpowered spinning wings that create lift without using a motor.
Normally, airplanes use wings to fly that create lift through both decreasing the pressure above them and directing air downwards to make the plane go up.
Autogyro planes are different as they use angled rotating blades to create lift in a similar way to a helicopter, but these wings freewheel around due to being angled slightly backwards, making them work a bit like a windmill.

My goals for this project were to first build a small RC autogyro to learn as much as possible about autogyro design.
Next I could scale up the design and see if a simple RC autogyro design would work on a giant scale.

I glued some strips of foam together at specific angles and fitted strong carbon reinforcements to the leading edges to make the blades.
With another piece of carbon to serve as a rotor shaft and some 3d printed stoppers, I had a rough first rotor setup I could build my first autogyro around.

So, now we had the blades working pretty nicely, next it was time to design our first helicopter fuselage to go underneath them.
I based this on a design I found online, to get the general proportions and shapes, cutting out parts from some 3mm depron.
I fixed a small brushless motor on the front and some rc servos on the rear for controlling the control surfaces that would make the plane steer.

It's initial flights weren't perfect but there was potential in the design.

Over the next few days I slowly improved the version 1 gyrocopter, making the blades stronger through adding more carbon fibre while increasing the thrust of the motor by using a higher voltage battery.

Finally we had it flying like a plane… or a helicopter… or a bit of both. It was difficult to remember this was not really either. It was flying beautifully and was really controllable.
Here is a link to the model I based my design off. It's called the 'Kwirl'.


I wanted to scale up the design to build a more powerful, more capable flying RC plane that was twice the size to see if an airliner style helicopter plane would be possible at a larger scale.
For this plane I would use foam board to build the fuselage, as it was a bit more rigid for the larger scale of RC plane, gluing and taping it together until I had a strong box that would hold all the electronics.

Now to design the blades, but these would also need to be made from a stronger material than the Depron.
For this, we decided to use the new Project Air hotwire cutter used in a previous video to make XPS foam wings with specific airfoil.

Also, our blades had been easily damaged on our small plane, and this problem would surely be amplified on this larger autogyro as any sudden impact with the ground would have much more force on the blades.
To fix this problem, I decided to use aluminium plates with bolts that could move just a little bit so that if, or when, a blade came into contact with the ground, it should move a bit - effectively engineering in a weak point to soak up some of that energy.

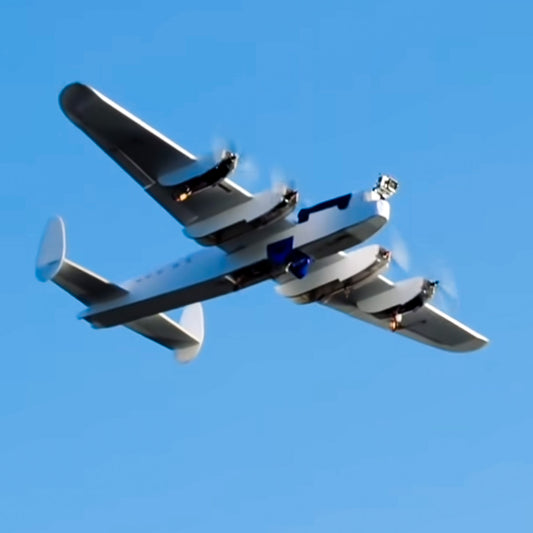
With two motors added for extra thrust, the design was looking good, and not a million miles off the famous Rotordyne autogyro airliner that inspired the project.

Out in the test field, we could now see if a larger simple RC gyro plane would fly. The centre of gravity balance was a little off, but that had looked promising. The plane looked like it wanted to fly.

After some tweaks and adjustments of the CG, we were getting there and the plane was managing further and higher flights in the small test field, despite the gusty conditions.
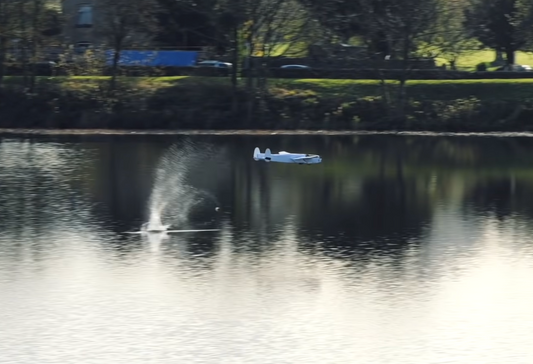
After reducing the dihedral and swapping to more powerful motors, I hoped this next flight would be even better - but the wind had become even worse… so what happened next was sort of inevitable.


Disaster, the plane was written off. The wind had swept it out the sky and it tumbled straight into the neighbouring field, scaring the flock of sheep.
At least the improvements had shown the plane had enough lift and thrust to overcome the weight and drag of the aircraft.
The next plane would again be much bigger than the previous version, meaning it would have far more lift than the previous planes.
We decided to go with lightweight 25mm insulation board to build the fuselage.

This was going to be quite a big plane to build so I needed a lot of help cutting out all of the pieces, so Emma made sure to scale up the previous design by tracing 200% scaled up parts to the material.
This stuff is great as it’s really rigid and even water-resistant with it’s skin of thin aluminium.

After a couple of hours, she had all the parts cut out so next I could hot glue everything together until it resembled a much larger version of our V2 aircraft, taking what we’d learned about it’s best bits and implementing them into the bigger design, and everything was feeling pretty strong.

We knew the rotors went under a lot of force, so I designed a strong rotor box and made the arms out of 30mm carbon tubes which should be incredibly stiff.

The previous hotwire cut XPS foam wings had actually been quite heavy, so we made some much lighter rotor blades from a combination of foam board and depron, which was less than 50% of the weight.
I made some solid 3d printed rotor hubs with large bearings and fitted them with double the number of aluminium arms, bent to be at the correct angle which could also pivot just like on the previous plane to soak up the energy of a blade hitting the ground.

We had seen this type of aircraft was quite bad at flying in breezy conditions.
The problem was the plane was quite heavy, and also had lots of drag.
This meant we’d need more lift from those rotors and more power from the motor to fly, compared to the previous planes.
We took the plane out for its maiden flight and crossed our fingers.


No luck. This was the low point of the project - the plane looked like it simply wasn’t going to fly. It picked up into the air for a few seconds before crashing to one side on several launches.
It was time for one final try.

After a hard launch the plane held in the air for a few seconds before once again drifting to one side and into the ground.
The spinning blades were creating just too much drag and the thrust from the motor was just not enough.

So we’d found the limit of how big a simple RC autogyro could go and discovered that these planes really do fly much better on a smaller scale!
I’d achieved my primary goal of building a successful RC autogyro and, although our final plane couldn’t fly for long, we had successfully built three highly educational aircraft that taught me a massive amount about the basics of autogyro design.

If you enjoyed reading this article, check out plenty more over on the articles page!
